How to Become an H3 Hang Glider Pilot in the Bay Area
After a long 2.5 years of training to get to our H3 rating, we thought it would help to share our journey and what we wished we knew when we first started; advice that could have helped us finish in <1 year. Of course this is our limited opinion, so take it all with a grain of salt and get advice from other pilots you trust.
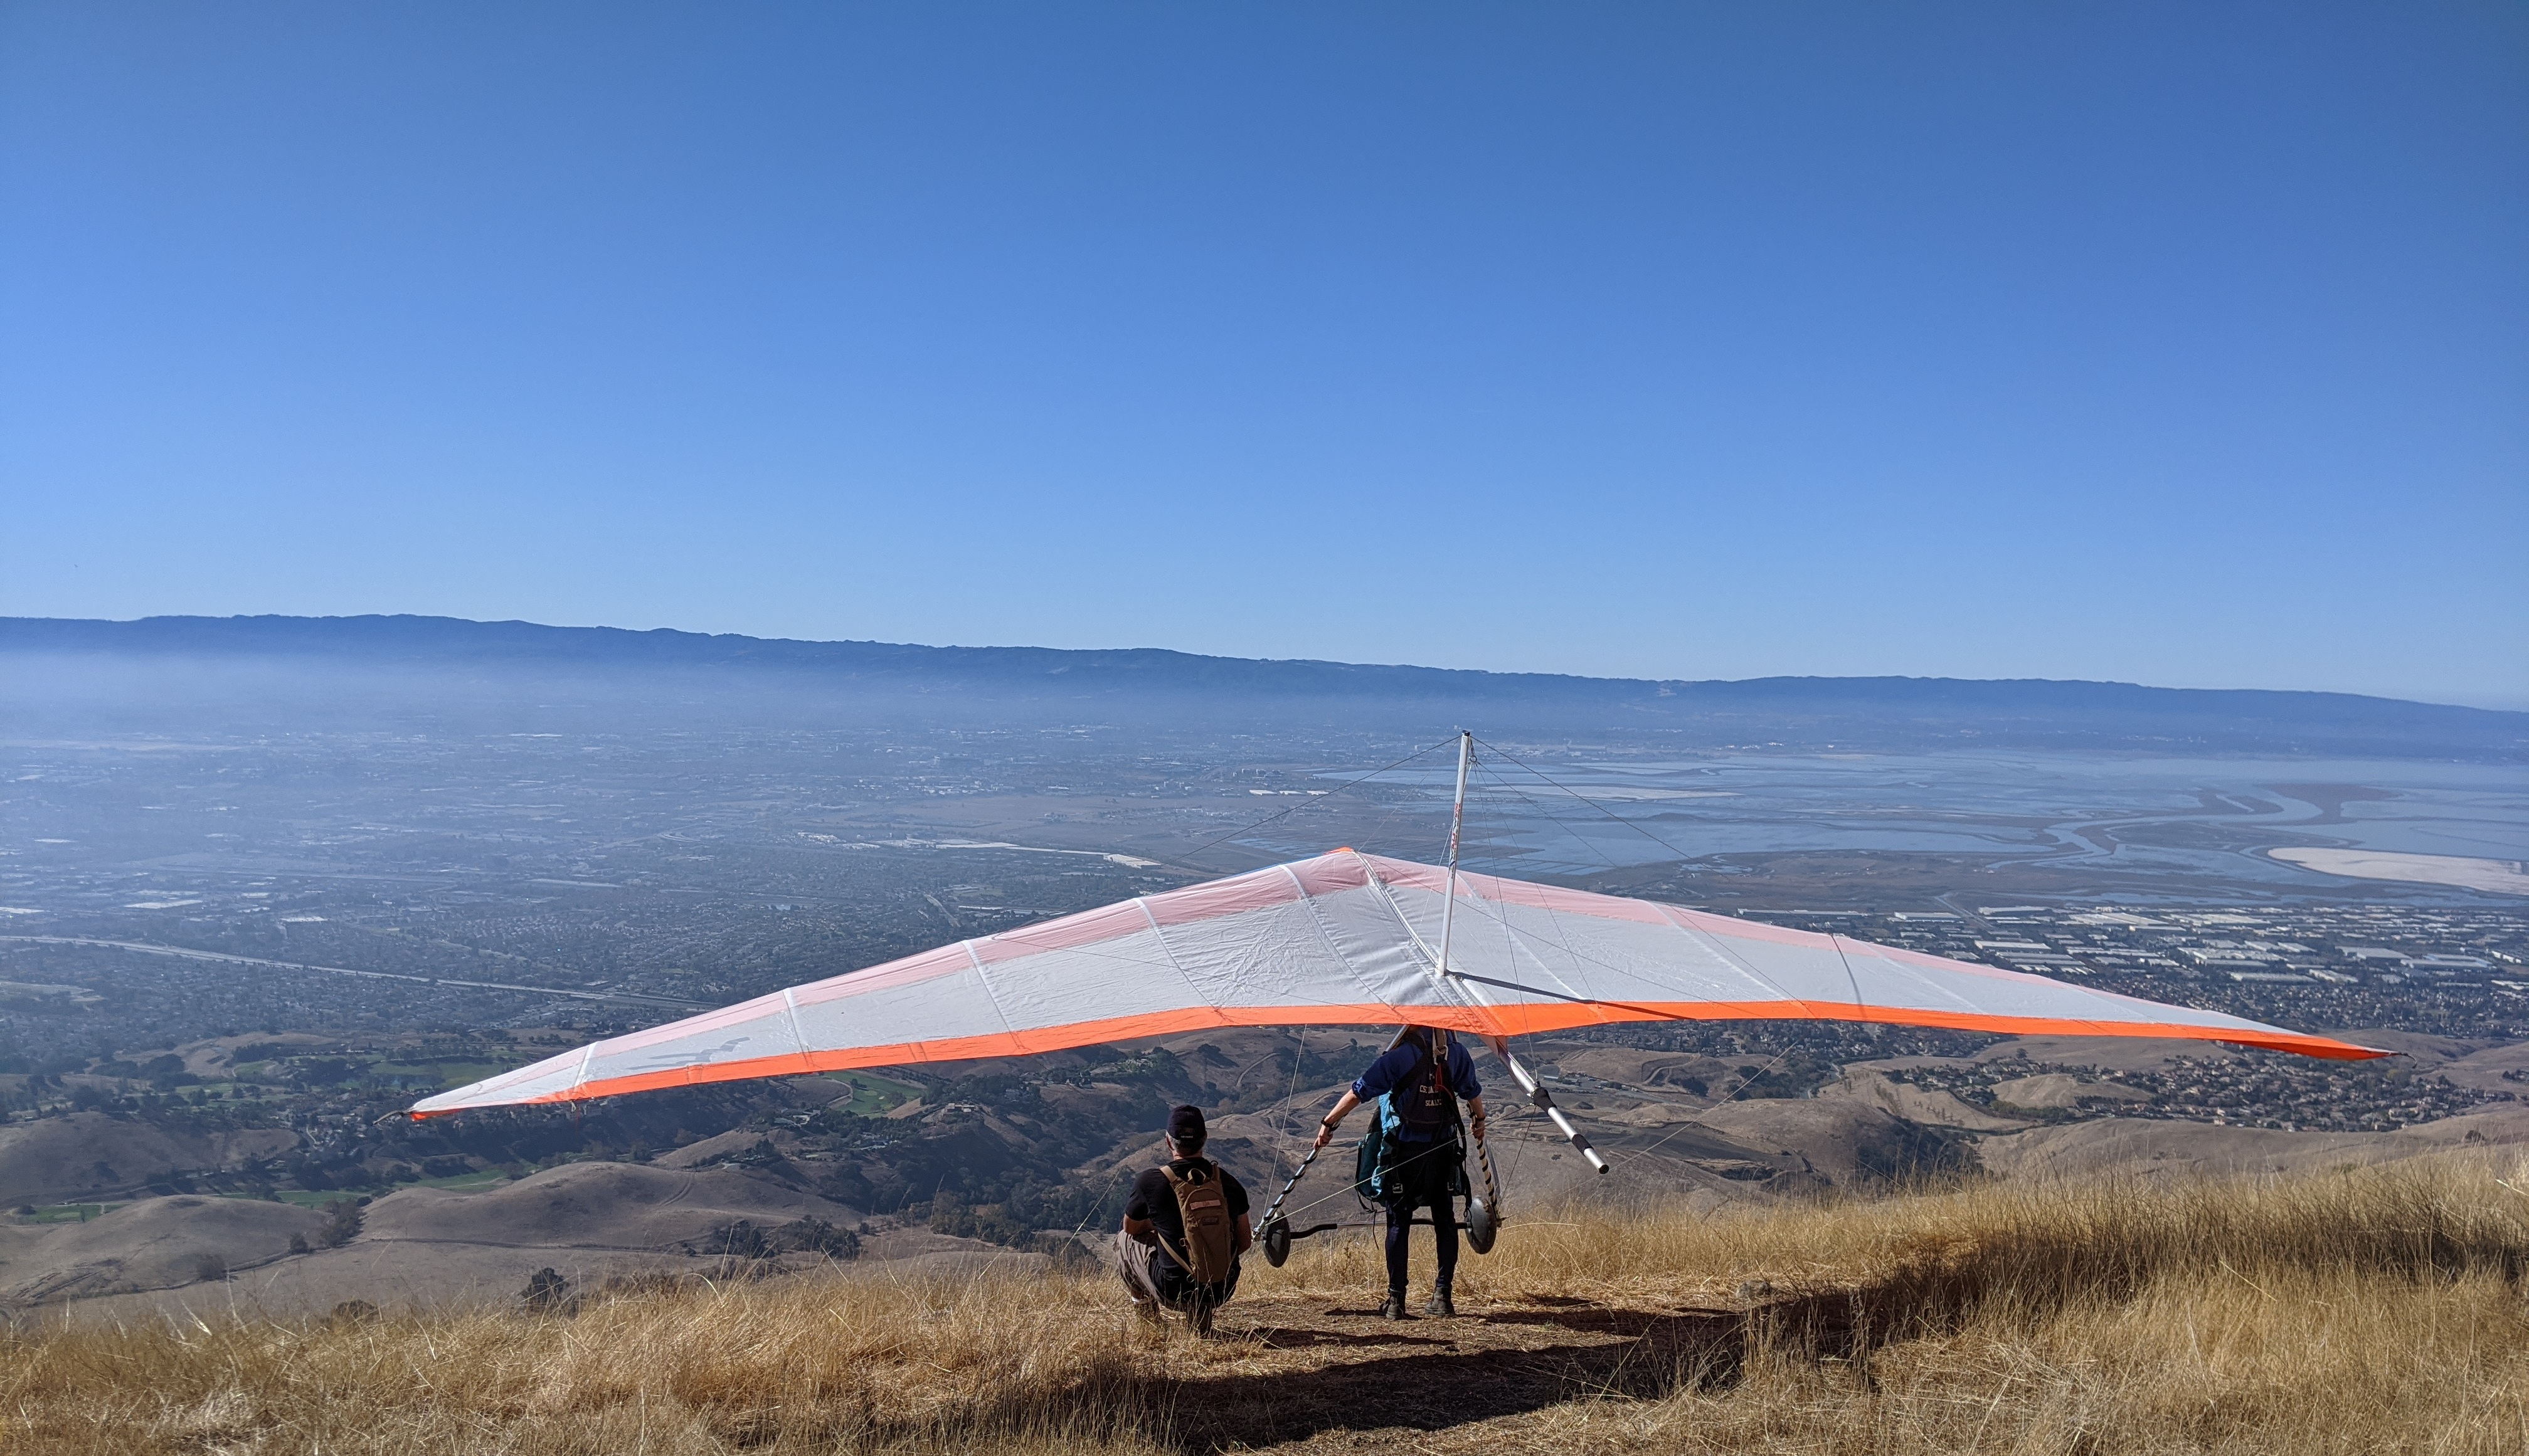 Scarlett and Takeo discussing launch at Ed Levin County Park, adjacent to San Jose, CA.
Why get a Hang3 (H3) rating?
We took our first hang gliding lessons because we loved the idea of flying and were curious enough to give it a try. But along the way, each of us eventually had a moment when we were truly hooked by the sport. For Brandon, it was the first time he was up at Mission Peak watching pilots take off, soar together for as long as they choose, top-land, and hang out until they decided to take off again at their leisure.
Now we could see ourselves continuing doing it for the rest of our lives, committed to achieving some level of mastery. This dream of soaring, riding thermals, chasing lift from ridge to mountain top, requires the accumulation of many important skills. Assuming you're already interested in learning to hang glide, let's first start by convincing you why it's worth it to go all the way through H1 and H2 to get to H3 rating.
USHPA is the organization dedicated to making free flight (hang gliding and paragliding) possible and safe. They are responsible for certifying flying sites and standardizing the skills required to fly them safely, through the USHPA ratings (H1 to H5) system. Each flying site has a minimum required rating, so as you progress in your ratings, more and more sites will become accessible to you. USHPA also collects incident reports related to the sport. If you want to understand the risks of the sport, I'd recommend this great article.
Hang1 (Beginner) is just takeoffs and landings
Your H1 training is critical, as it builds the foundational skills of strong and safe takeoffs and landings. However by the end of this training, you are probably only flying from a 50ft hill in a straight line. With an H1 rating, it's likely that each flying day is still a lesson with your instructor, as they take you up to higher launches and teach you essential skills. Each time you launch for the first time from a new height is exhilarating, but let's be honest, if you didn't know you were destined for greater things, you wouldn't keep coming out each weekend.
Hang2 (Novice) is limited to certain sled rides in Norcal
A moderately long flight (8 min) from the top of Ed Levin — you can see why they call it "Sled Levin".
Once you get your H2, you'll be flying from higher launches (e.g. >1000ft). You can safely turn, maneuver, and plan flights to make sure you get to your landing zone. The first time off the top of the mountain will be an awe-inspiring experience (certainly IG-worthy). At this point you're independent for the first time — you're done with formal lessons and free to go out and fly on your own (ideally with your wingmates). It's up to you now to develop your skills, learning from more senior pilots, finding places to fly, seeking out advanced clinics (especially parachute clinics) to learn new skills or practice safety procedures.
However, you'll quickly realize that you don't quite have the skills to handle anything but the most gentle wind conditions, and often only under the supervision of a senior observer. Because of this skill gap, you'll find that many of the coolest local flying sites will be closed off to you (such as Fort Funston, Mt Tam, Mission Peak). For sites that you can fly (such as McClure), you'll only be flying during the calmest parts of the day, like the morning and evenings. Most of your flights will be ~10 minute sled rides from top to bottom. This is really fun for a few trips, but ask yourself: how many times a year would you be willing to drive an equivalent distance to Tahoe, with all the planning and expense involved, to take a few sled rides down a hill?
For this reason, many H2 pilots get caught in a terrible chicken-and-egg dilemma: Hungry excited new pilots want to fly a lot and work towards the required 10 career hours to get to their H3 rating. However, they're limited to these short sled rides at limited sites. If each sled ride is 10 minutes, and you are flying once per half-day, would you spend 60 half-days going to the same sites to crank out your 10 hours to H3? From personal experience, we can tell you it can be exhausting and occasionally demoralizing. Unfortunately, this appears to be a function of the quality of available H2 sites in Northern California, and may not be as bad of an issue in other parts of California.
Hang3 (Intermediate) is when the real fun begins
A ~2 hour flight together at Crestline
In our opinion, H3 and above is pretty much the whole point of learning to hang glide in the first place. You have built up enough skills to fly safely in a much larger network of sites. At any time, you can plan a trip with fellow H3 pilots, without requiring the generosity of senior observers to take you out. Many of these sites are soarable, meaning you can easily stay up for hours as you navigate different forms of lift, including ridge lift and thermals. While you've always been pilot-in-command of your glider when it comes to safety, you are now exercising additional piloting skills to actually enjoy the flight. When you reach this point of refining your craft and skills, hang gliding becomes a life-long hobby, not just an occasional thrill.
Just to give a little more taste of what we are so excited about here. Once we finally were flying for over an hour at mountain sites, we finally understood the real "sport" of hang gliding. There's an intense challenge to seeking out lift, judging where thermals are likely to form, figuring out how to climb within a thermal. Coastal flying with strong steady winds and ridge lift provide a whole new experience, with the challenge of high wind ground handling and the freedom to be able to dive and swoop at will without worrying about having to recover altitude.
Steps
So now to the specifics: how would we do it if we had to do it all over again?
- Get a tandem flight, or at least spend time at Fort Funston / Mission Peak with some local advanced pilots. Hang gliding has a significant upfront cost in time and money, so if you have any interest at all — do the relatively low cost thing and try it out first! See if you enjoy the sensations, the community, and the environment. If you begin this journey, it only makes sense to commit to mastery (for your own enjoyment and safety), so make sure it's a good fit first.
- Choose a good USHPA-certified instructor: Locally, only 2% of people who start their training get to a Hang1 rating. This is partly because many people are just out for that one-time experience, but this means that the vast majority of people writing reviews on Yelp focus on how fun that first lesson was. But are these the best instructors in terms of instilling good habits and solid safety fundamentals? Make sure that you get an instructor recommendation from a pilot that you trust. We are happy to provide recommendations to anyone that asks (just email/message us). Also, don't prioritize cost over quality. A good instructor with high integrity will make sure you are a good and safe pilot at a reasonable overall cost. Everyone learns differently (We were pretty slow). Any program that advertises a guaranteed rating for a fixed price: ask yourself if that is the best set of incentives for an instructor? (It's not) At a minimum, make sure your instructor is USHPA-certified. Not all of them out there are, and you can't get an USHPA rating from anyone who isn't rated by USHPA to give you one.
- Reserve dedicated time to cranking out each rating: Commit to flying at least 1-2 times per week while getting your H1. When you go for periods without flying, it's 1 step backward for every 2 steps forward. Going regularly during training improves the rate at which you learn, which ultimately saves you money. Instead of spreading our training over 2+ years, it would have been better to dedicate a month (or two) to each H1, H2, and H3. For example, getting your H1 can take anywhere from a few focused days of training to a few months if you go weeks between lessons.
- Get a wingmate and peer cohort: Hang gliding is a social activity. It has similarities to skiing. Each flight is solo, but half of the fun comes from sharing your awesome experiences together at the bottom. It is also much easier when you can split the burden of lodging and driving to sites. Having someone else relying on you to go out and fly with is also a good motivator to get you out of bed on a Saturday morning. It's a long journey to H3, and everything is much easier with a buddy.
- Find good mentors: Your first mentor will be your instructor, but that won't be enough. You will learn a lot from different perspectives. Plus, your instructor may not have the time to bring you to the new sites you want to try out. Because H2s will often need senior observers, start early on building relationships with other good senior pilots. You'll need those relationships to get past the H2⇒H3 hurdle.
- Join the local Facebook community: For some reason, hang glider pilots love Facebook. For both of us, it is the only thing we use Facebook for these days. If you are an SF Bay Area pilot, join this group. On these groups, you meet other pilots (both peers and potential mentors) and see when folks are organizing trips.
- Join USHPA: This is the organization that issues the ratings and you will need to be a pilot member to get your rating. You will need a membership to fly at most sites, as it also provides for insurance for pilots and landowners.
- On the way to your H2 rating, get your own gear:
Before your H2, you'll be mostly renting gear from your instructor, because you'll mostly be using dedicated beginner training gear. It's good to get your own gear while still taking lessons because your instructor can advise you on what to buy and can work with you to adjust to your new gear. It helps greatly to train on the gear you'll actually use, so typically once you're at the point where you need a real harness and parachute it makes sense to buy.
- Glider: Falcon ($2-3K used, $4-5K new) It's pretty likely your first glider will be a Falcon. It's popular, easy to get parts, and best for beginners. Work with your instructor to procure one that is the right size for you. We started with used ones, with the expectation that we'll trade up after more experience.
- Logbook: (Cheap) You'll need a physical logbook for your instructor or mentor/observer to sign you off. However, you'll most likely want to keep a digital logbook for your personal records. Feel free to use our template.
- Books: Your instructor will help you with ground school. Most pilots keep a copy of Dennis Pagen's book, which serves as a great reference.
- Harness and parachute: (<$2K) This is probably a more important choice than your glider. The first thing you'll want to discuss with your instructor is whether you want to go with a cocoon or pod harness. They have very different trade-offs in comfort, storage, and positioning (which might affect your flying). It may also depend on your body type. We were recommended to buy a brand new harness and parachute. It's not the type of thing to cheap out on and you will most likely use your harness for the rest of your life (unlike your glider). It should go without saying that you should get a quality certified parachute, and get it repacked before using if not buying new.
- Helmet: ($100-500) There are a lot of opinions on helmets and again we recommend you talk to your instructor about this. We were recommended to buy a quality motocross helmet (e.g. from Kali), so that's exactly what we did. There will occasionally be massive sales on helmets so it's worth keeping an eye out while borrowing your instructor's helmets.
- CamelBak: ($20-100) Especially during the summer, sites can get quite hot. You do not want to get dehydrated, as it will affect your concentration, focus, and ultimately safety. Do not underestimate this danger.
- GoPro + large tube mount: ($200-400) There are tradeoffs between viewing angle and battery life, when choosing between a standard Hero or 360 camera. Some even attach external batteries. Whatever your choice, always record every flight. You never know when you're going to mess up and you will want the video footage to debrief any mistakes with your mentor.
- Vario mobile app (+ much later, a phone mount): ($10-20) Once you're flying anywhere above the 50ft hill, start using a mobile app as a vario (such as FlyMe for Android or FlySkyHy for iOS). It will automatically track the length of your flights, which you'll need for your logbook. You can upload your flight path to Ayvri to get a cool visualization of your flight over a map. Seriously, just get the app and stick it in your pocket. You'll love having that automatic record of your flight times. Later, you can mount your phone to your to your glider (can be as simple as a standard bike mount), and during the flight it will show you your altitude, vertical speed, and even help you find thermals!
- Dedicated Vario: ($100-200) Once you start trying to soar, you'll want a dedicated vario to fly with that beeps an audible indicator to tell how fast you are going up or down and can show you other information about your flight (time, altitude, path). You can continue to use your phone and get a Bluetooth accessory vario (like the Bluefly), which pairs to your phone to give your vario app more accurate data. Or you can buy a dedicated Vario, such as a Flytec, which is designed for use with hang gliders, probably more rugged than a phone, but likely more expensive and has a steeper learning curve.
- Ham radio + license: ($30-100) As soon as you start flying sites that are not your training site, you'll probably want a ham radio and a license to operate. Most sites have little to no cellphone reception and this will be your lifeline if there is an emergency. We recommend dedicating 1 week, memorizing as many questions as possible using hamstudy.org, and just taking the test. You'll want the license ASAP for use, and you can always go back and read a book later. We bought the cheapest Baofeng radios we could find.
- Truck 4x4 with rack: (Expensive) By the time you're an H2, you will definitely need some way to get to launch sites. Many sites are at the end of very rocky terrain, which can only be traversed with a 4x4. For a while you may be able to skate by, relying on the kindness of friends or strangers organizing trips. Consider pooling for a dedicated vehicle with friends when the time comes. At a minimum you should invest in a way to transport your glider from wherever you store it out to flying sites, even if it's some ladders strapped to your car's roof rack. It's far easier to get someone to help you from the LZ to the top than all the way from home.
- [Optional] Dedicate 2 weeks of flying every day at an H2-friendly soarable site (like Andy Jackson) to get your H3 rating: Most sites that you fly as an H2 are going to be sled rides (~10 minutes). The key to quickly getting to your required 10 career hours is to score those lucky 1+ hour flights. In other words, you need to go to sites that are potentially soarable, of which only a small subset are H2-friendly (Andy Jackson, Hat Creek, and McClure). In both cases you will need an instructor or senior observer to help you get started.
- Why fly everyday? These sites are >4-5 hours away from San Francisco. It takes a lot of mental energy to just drive there in the first place. You'll be planning far out in advance and you cannot control when the weather will be good. The variance on what constitutes a good day is really high: some days you'll get a 10 minute flight, other days you'll get a 1+ hour flight. Flying every day is the best way to maximize the likelihood that you'll be there on a good day. For most of these soarable sites, the best time to fly is the summer evening glass-off. If you have a remote-friendly job, it is a perfect setup to work during the day and fly every evening. Can you split this into multiple weekend trips? Yes of course, but remember that the weather may not always line up.
- Why Andy Jackson? It's in San Bernardino. You'll have easy access to a big city, grocery stores, and fast Internet. Compared to Hat Creek, which is in the middle of nowhere, it is much easier to spend a prolonged period of time here. You can even drive your 2WD car to the launch sites. Even better, there are daily shuttles to take you there. And you'll be around other experienced pilots every day (even weekdays), because it's so convenient for SoCal pilots. Best of all you'll likely be flying after 5pm everyday, so you have plenty of time to get a full day of remote work in on weekdays. If you have friends that live in Los Angeles, it's a good reason to visit.
- Ultimately we got 7 hours of flight time over 2 weeks of flying every day, while working remotely. Some flights were 12 minutes. Most flights were 30 minutes. A handful of flights were over an hour. Plus we got to meet a lot of cool SoCal pilots and visit our friends in LA. Could we have gotten our required 10 hours in multiple weekend trips? Most definitely and many pilots have done exactly that. Just be prepared for some weekends where you barely fly.
At the end of the day, hang gliding is a sport with pretty high upfront cost, but very low operational expenses once you are a H3. If you have all the gear and ratings, you usually fly at any site for the cost of gas to go there.
Continuing education
It's important to note that learning is never done. There's obviously the H4 rating to work towards, but more importantly, all throughout you should be seeking out opportunities to learn new skills and practice safety procedures. Some of our top suggestions include:
- Parachute clinics: learn not to fear that bundle you strapped to your harness back in your H2 days. Parachute clinics serve two purposes: repacking and practice. You should get your parachute inspected and re-packed by someone who knows how every 6 months, and parachute clinics are where people who are certified can help you. Good clinics will also teach you more about how and when to use your parachute and will give you a chance to practice throwing a chute while simulating a disaster (e.g. spinning you around in your harness).
- Towing: surface towing (being pulled aloft by a winch) and aerotow (being pulled by a plane) offer opportunities to fly in locations and conditions when you otherwise couldn't. In the Bay Area, flying at Tres Pinos can be a great way to keep up your skills during the winter. Towing requires learning some new skills but can make you a better more versatile pilot overall.
- Launch and landing practice: go back to your favorite training sites and practice launches and landings. Advanced pilots may soar for hours and get only one chance to practice launching and landing per flying day. That can lead to atrophying skills, you may be able to get by with sloppy launches and landings for some time, but it will come back to hurt you — don't take the most dangerous parts of hang gliding for granted.
Our Journey
So if the above is how we'd prefer to do it, it goes without saying that we learned the hard way by doing the opposite, motivating this article.
- Ray never got a tandem and Brandon got a tandem only much later into his training.
- We were really lucky to have amazing instructors in Robert Booth and Takeo Eda, but we did not take our training seriously in the first couple years, sometimes only flying once per month. Then we complained that we were on the 50ft hill for what seemed like forever.
- We took a while to join the respective Facebook groups and make friends in the community. We were probably more shy than we needed to be, because everyone we met has been super open, friendly, and willing to help. Getting tips from fellow pilots, organizing trips together, getting site intros — these were critical to our progression when we were H2 pilots.
- We spent countless trips trying to eke out minutes at Ed Levin. While this is fantastic for take-off and landing practice, after 2.5 years we had only a handful of hours. We were really hesitant to justify to our coworkers and family to let us take 2 weeks away flying at Andy Jackson, but in retrospect it was 100% worth it. We both got our H3 at the end of this trip.
We've also compiled some fun videos of our friends in the area for you to get a sense of the journey:
- Masayo: Year 1 Montage, Soaring Crestline, Flare Training
- Richard: Yosemite, Rubik's Cube, Tandem Flight
Join us!
Hang gliding can be an incredibly difficult and lonely journey for some, but it doesn't have to be. If you live in the SF Bay area, come join our community! https://www.bayareafledglings.org
It's filled with lovely pilots who are ready to answer questions, share trip plans, and educational resources. Like any other participatory culture, you will get out what you put into it. To start, we recommend:
- Sharing videos and trip reports of your flights. Be proactive in asking for feedback to refine your skills.
- Ask questions! Answer questions! Including about this post.
- Plan trips: You'll make some cool friends
Thanks to Jess Koerner, Richard Sibley, and Bayley Adams for their feedback on the post. Thanks to Scarlet Passer for joining us on this journey. And a million thanks to Takeo Eda and Masayo Miyauchi for mentoring us through countless weekends at Ed Levin.
Agree? Disagree? Want to share your own personal experiences? Join the conversation on: