A/B Testing with Next.js middleware

In this blog post we will show you how to implement A/B testing using Next.js middleware, first introduced in Next.js 12. When compared to other A/B testing frameworks, this method more easily fits into your existing developer workflows and inherits all of the performance benefits of Next.js, including static site generation (SSG). You’ll see that A/B tests don’t have to be onerous for either your users or your developers — every Next.js site can easily make measurable progress this way!
What is Next.js middleware?
// pages/_middleware.js

export default function middleware (req, ev) {
  console.log('Edit and run this at the edge!')
  return new Response({
    ip: req.ip,
    cookies: req.cookies,
    ...
  })
}
Middleware is a new powerful addition to the architecture of Next.js applications. Middleware are arbitrary functions that you can write, which are executed on user HTTP requests before they hit the Next.js server. In practice, middleware functions are deployed to the cloud edge (i.e. CDN), on a platform like Vercel. By running on the edge, middleware can quickly rewrite and reroute requests to the server, or respond directly to short-circuit the server. The fast performance comes with the trade-off of a limited runtime environment. Middleware have been used to perform fast bot detection, feature flags, analytics, routing, and A/B tests.
A/B testing using Next.js middleware
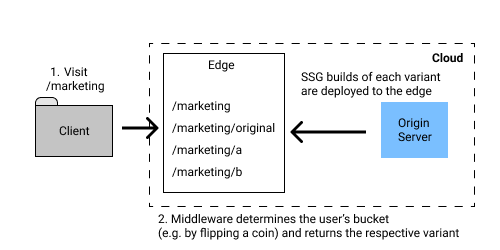
Middleware functions run at the edge (i.e. CDN), providing a way to quickly re-route requests. When paired with SSG, the entire A/B test can be served from the edge.
Middleware is the perfect tool for implementing A/B tests (also known as split tests). The middleware transparently redirects different users to different versions of your application, which you can use to assess how each version impacts your business metrics. The diagram above shows how Next.js A/B testing works at a high level when paired with SSG.
- When a user first requests a page, such as your homepage, the middleware will flip a coin to choose which version to serve.
- The middleware transparently proxies the request to the appropriate variant and sets a cookie, so that subsequent requests from the same user see the same variant and the user is oblivious to the A/B test.
- Routes can either be served at the edge if built via SSG, or served at the server via server-side rendering. When routes are also served from the edge, users benefit from lower latencies to content.
In practice, the developer can implement each variant that they want to test as a separate route, and the middleware glues it all together.
Comparison to other A/B testing approaches
Client-side A/B Testing
Many A/B testing products (like Google Optimize, Adobe Target, and VWO) default to a client-side approach for serving A/B tests. This is often the easiest way to integrate into an existing tech stack, where a developer adds a script tag to the page they want to test. Many of these products offer a visual editor to modify existing pages in production. When the test is run, the client-side script will contact a server to determine the user’s bucket, then dynamically modify the DOM before showing the test to the user. This results in either noticeable delays if using synchronous JavaScript, or a flash of baseline content if using asynchronous JavaScript (as you’ll see in the results below). These side effects often have a negative impact on your web vitals score and consequently SEO rankings.
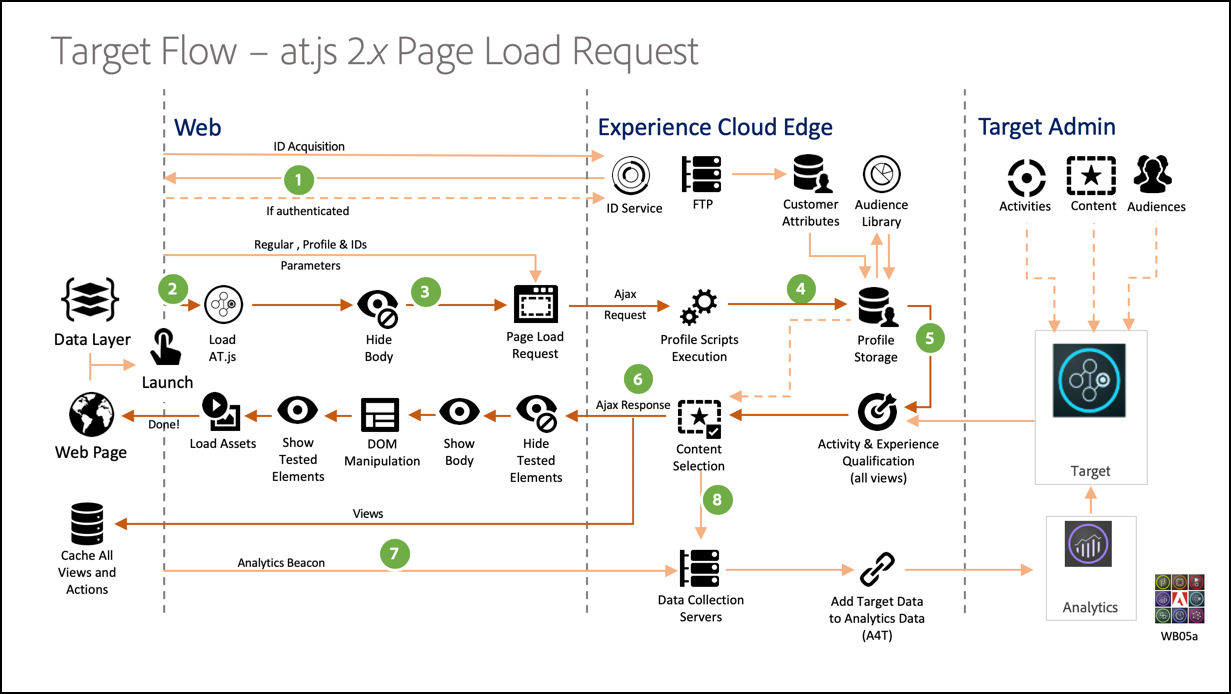
Source: Adobe Target documentation
link
Server-side A/B Testing
Many A/B testing products also allow you to do the split testing on the server-side. In this configuration, the developer has the freedom to implement their split tests how they want, contacting the A/B testing service to determine a user’s bucket and report events. While this method gives the developer the most control, it may incur higher latencies because every request must hit the origin server. Worse, because 2 users may see different responses from the same URL, CDN caching becomes much less effective.
A/B testing via middleware
In summary, running A/B tests via middleware has a number of advantages:
- Bucketing at the edge: User bucketing is on the critical path and can severely impact load times. By doing this at the edge, we can leverage its short latency to users.
- Bucketing on the initial request: Middleware will determine the user’s bucket off the initial HTTP request, obviating the need for additional requests. This leads to faster load times compared to client-side A/B testing.
- Leverage static site generation (SSG): If your page variants are built with SSG and served at the edge, then your A/B tests can run entirely from the edge, leveraging the performance benefits of your CDN. This configuration leads to faster responses compared to server-side A/B testing frameworks, which require you to hit the server on every request.
Implementing A/B tests
First, make sure you are running at least version 12 of Next.js. An easy way to ensure this is to install the latest version:
$ npm install next@latest
If this is your first Next.js project, follow this quickstart guide to get your Next.js project up and running.
Add the middleware
Suppose you have a marketing page that you want to test in pages/marketing.jsx. First, create a pages/marketing/ directory and move your original page into this directory.
Middleware is defined by adding a _middleware.js file in that directory:
// pages/marketing/_middleware.js

import { NextRequest, NextResponse } from 'next/server'

const COOKIE_NAME = 'bucket-marketing'

// Choose a random bucket
// Optional: contact a 3rd party service to get the user's bucket
const MARKETING_BUCKETS = ['original', 'a', 'b'] as const
const getBucket = () => MARKETING_BUCKETS[Math.floor(Math.random() * MARKETING_BUCKETS.length)]

export function middleware(req: NextRequest) {
  // Get the bucket cookie
  const bucket = req.cookies[COOKIE_NAME] || getBucket()
  // Proxy to the appropriate variant
  const res = NextResponse.rewrite(`/marketing/${bucket}`)

  // Add the bucket to cookies if it's not there
  if (!req.cookies[COOKIE_NAME]) {
    res.cookie(COOKIE_NAME, bucket)
  }

  return res
}
In the example above, we flip a coin in the middleware to set which variant the user sees, which allows us to avoid a round trip to the origin server. However, you might want integrate with a 3rd party service for managing how users are bucketed in the A/B test. This might be an A/B testing service like Google Optimize or a feature flag management service like LaunchDarkly. In this case, simply modify the middleware make a Fetch request to your 3rd party service to set the cookie, instead of randomly assigning.
Deploy your page variants
Notice that this middleware will transparently route users visiting /marketing/ to 1 of 3 possible paths:
pages/marketing/original.jsx⇒/marketing/originalpages/marketing/a.jsx⇒/marketing/apages/marketing/b.jsx⇒/marketing/b
You can copy the original page to these 3 routes and make your various edits to the respective variants. If you leverage SSG via getStaticProps, then each of these variants will continue to be served from a CDN for best performance.
These routes are hidden to the user, who just visits /marketing/. The middleware will select the correct bucket and transparently route users to the right variant.
Leveraging Plasmic variants [optional]
Plasmic is a visual editor that works with Next.js, where you can easily create full pages in a WYSIWYG studio. If you have not yet set up Plasmic in your Next.js project yet, you can follow this quickstart guide.
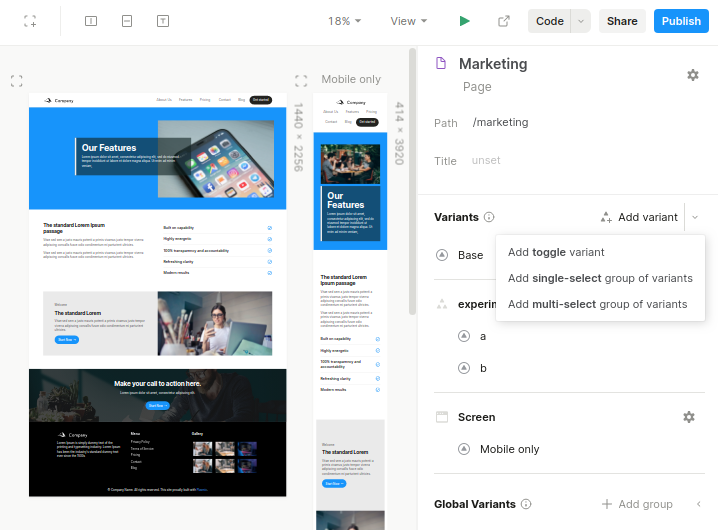
Let’s assume that you already have a Marketing page in Plasmic. You can create page variants in the rightside pane. In this example, I’ll “add a single-select group of variants”, where I name the group experiment with 2 variants, a and b. These variants are expressed as overrides over the base variant. Click here to read more about Plasmic variants.
Once you’ve created your page variants, you can render individual pages by using the following code in your Next.js page routes pages/marketing/{original,a,b}.tsx. Just change the experiment key in componentProps of PlasmicComponent to choose which variant to show. For the base variant, just pass in null.
// pages/marketing/original.tsx

import {
  initPlasmicLoader,
  PlasmicRootProvider,
  PlasmicComponent,
  ComponentRenderData,
} from '@plasmicapp/loader-nextjs'
import { PLASMIC } from '../../plasmic-init'

// Statically fetch the data needed to render Plasmic pages or components.
export const getStaticProps = async () => {
  // Make sure you call `fetchComponentData` with the right path or component name defined in Plasmic.
  const plasmicData = await PLASMIC.fetchComponentData('/marketing')
  return {
    props: {
      plasmicData,
      // ...
    },
  }
}

// Render the page or component from Plasmic.
export default function Page(props: { plasmicData: ComponentRenderData }) {
  return (
    <PlasmicRootProvider loader={PLASMIC} prefetchedData={props.plasmicData}>
      <PlasmicComponent component="/marketing" componentProps={ { experiment: null } } />
    </PlasmicRootProvider>
  );
}
For the a variant, pass this in as a componentProp.
// pages/marketing/a.tsx
...
    <PlasmicRootProvider loader={PLASMIC} prefetchedData={ props.plasmicData }>
      <PlasmicComponent component="/marketing" componentProps={ { experiment: "a" } } />
    </PlasmicRootProvider>
...
For the b variant, pass this in as a componentProp.
// pages/marketing/b.tsx
...
    <PlasmicRootProvider loader={PLASMIC} prefetchedData={ props.plasmicData }>
      <PlasmicComponent component="/marketing" componentProps={ { experiment: "b" } } />
    </PlasmicRootProvider>
...
Because we are using getStaticProps in this example, Plasmic generates code at build time so that static pages can be served from your CDN. If you are using next dev, the Plasmic Next.js plugin will also automatically rebuild on any detected changes from Plasmic Studio, allowing you to easily continuously edit your pages.
Connect to your analytics
Depending on which analytics provider you use, you’ll want to instrument your A/B test. The following code snippet assumes that you have already set up your project with Segment, but most analytics libraries will look quite similar:
analytics.track('pageview', {
  // Use a unique key for your experiment and tag which variant you're showing
  'Experiment 1': 'a',
})
You will want to make sure that you add a property for the experiment, and then wire in which variant the user is seeing so that you can segment on the variant when analyzing your retention and conversion funnel.
For quick access to some analytics-specific reference articles, see:
Current state of deployments
- Vercel: You can easily deploy your Next.js application via Vercel (see their deployments guide), which will deploy your middleware to Vercel Edge Functions. Under the hood, Vercel API routes are run on AWS Lamba and middleware are run on Cloudflare Workers.
- Netlify is compatible with Next.js 12 as well. However as the time of writing, Next.js 12 middleware is still deployed to origin servers, as opposed to the edge. Netlify is still actively working on their Edge Handlers offering. Netlify also has their own built-in split testing feature, which may have similar performance characteristics, albeit with less ability to customize and integrate with third-party tools.
- In any other server-side deployment of Next.js, middleware will automatically run at the server.
Results
For a quick benchmark, we implemented a quick marketing page and deployed to Vercel at https://next-ab-test.vercel.app/.
See here for project assets:
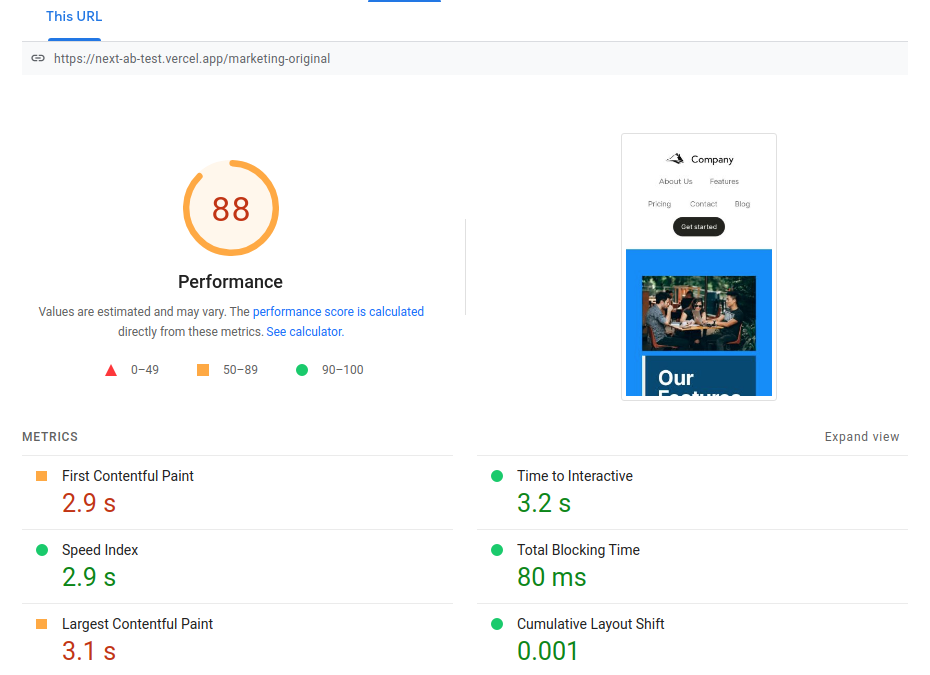
Baseline
https://next-ab-test.vercel.app/marketing-original
When analyzing baseline page speed performance using Google’s PageSpeed Insights tool, we show a score of 88. The slower times to contentful paint are likely caused by the heavy use of images on the marketing page.
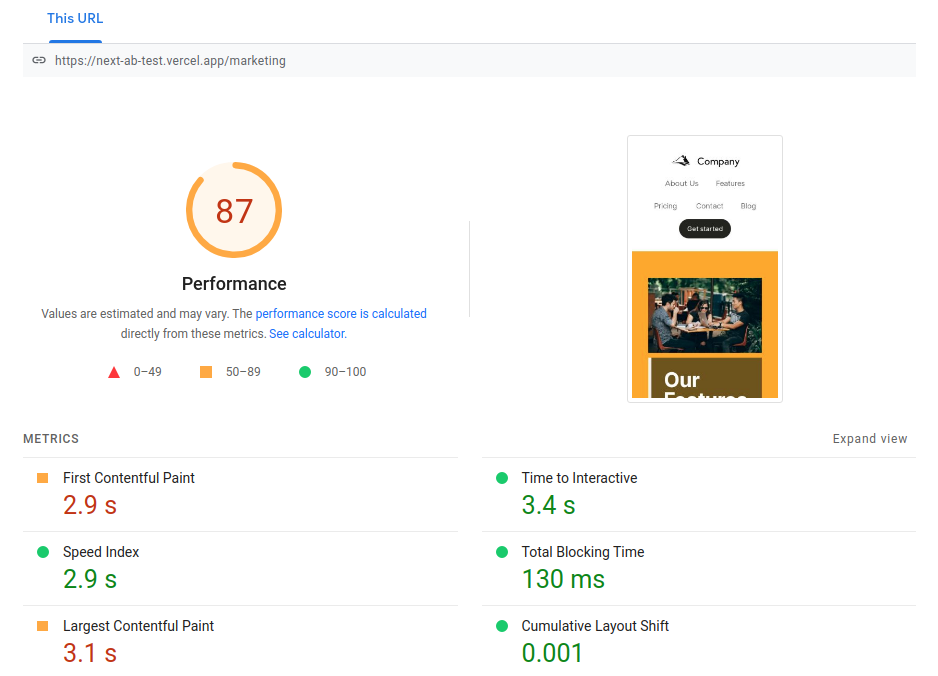
Next.js + Middleware
https://next-ab-test.vercel.app/marketing
When using Next.js middleware, we see performance minimally affected. The middleware function is run on the initial HTTP request, yielding a slight additional delay to the initial page load.
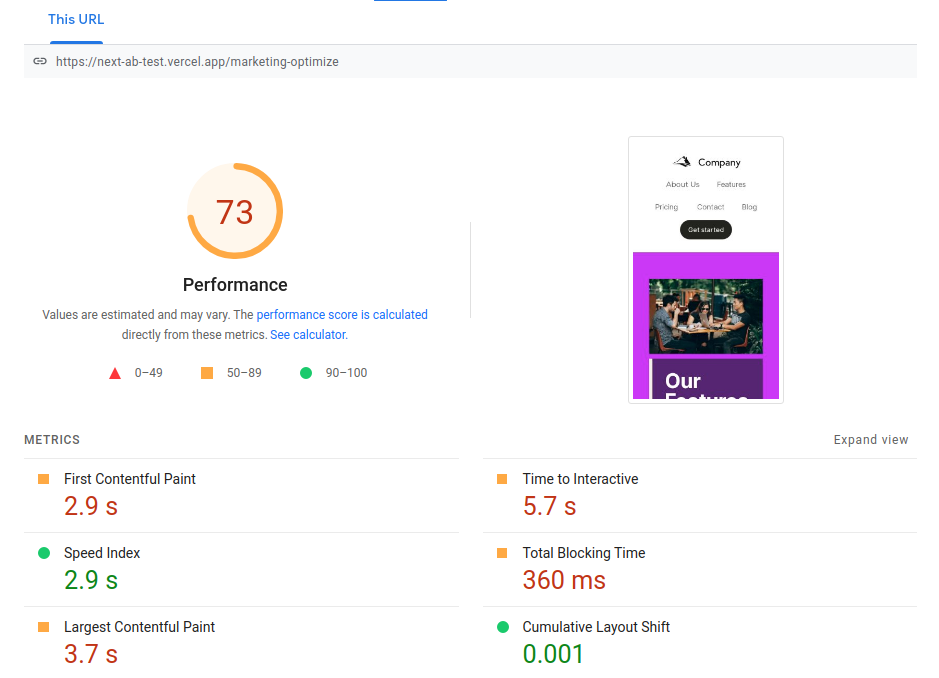
Using Google Optimize
https://next-ab-test.vercel.app/marketing-optimize
We then implemented the same A/B test using Google Optimize to showcase the performance when using a client-side A/B testing framework. We expect most client-side frameworks (like Google Optimize, Optimizely, Adobe Target, and VWO) to have similar performance due to similar architecture.
In client-side frameworks, the baseline variant is initially loaded. Then client-side Javascript will make a subsequent request to Google Optimize, determine the bucket, and modify the DOM to implement the change. This results in a flash of baseline content when using asynchronous JavaScript.
What does all this mean?
With Next.js middleware, A/B testing easily fits into your developer’s workflow. Instead of using an out-of-band visual editor like Google Optimize or VWO, you can just create new routes in your Next.js project for each variant you want to test. By leveraging the edge to serve your tests, you can easily test full pages and web apps without sacrificing performance. These 2 factors significantly lower the development and operational costs, such that there is no good reason not to use A/B tests. For each iteration of your web page, deploy it to a new route and add it to your middleware and analytics to make measurable improvements time and time again.
Try integrated A/B testing in Plasmic!
The tutorial above shows how to manually implement A/B testing in code, optionally leveraging Plasmic as the page builder. You can also specify your A/B tests entirely within Plasmic in a no-code setting. This opens up the ability for anyone in your organization to rapidly create new experiences and deploy A/B tests in production. Check out our documentation on A/B testing to get started and create a free account at https://studio.plasmic.app/.